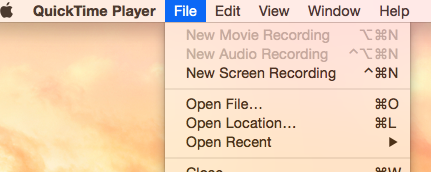
Steps:
-
Launch QuickTime player. It can be found in the applications folder.
-
Select File > New Movie Recording. (You won’t actually click record in this window. You are simply using it as a ‘viewfinder’ to show your face)

-
Select View > ‘Float on Top’ so that your camera window will be on top of any other application anywhere on your screen. If you do not select this, your video will not record you.

-
Now you can resize the camera window. You can move this camera view anywhere you want (left, right, top, bottom, etc).
-
Now again, in QuickTime Player, select File > New Screen Recording.


This will then appear at the bottom of your screen. The icons (from left to right) are:
-
Screen-capture entire screen (IMAGE)
-
Screen-capture selected window (IMAGE)
-
Screen-capture selection (IMAGE)
-
Record entire screen (VIDEO)
-
Record selection (VIDEO)
The one you need to select is ‘Record entire screen’. You need to check the Options so as to select where the file will save, if you want a countdown timer, which microphone to use etc.
You may want to arrange your screen (where will your camera be etc) before you start your recording.
-
-
When you are ready to start recording, click the record button.
-
Now you are recording your screen and your camera view (e.g., your face).
-
When you are done recording, click the Stop button at the top of the screen.

-
Your video will then show. You can make edits to your video using QuickTime.
For instance, you can go to Edit > Trim to remove the unwanted parts of your video.
Leave a Comment
Your email address will not be published. Required fields are marked *